

Filter categories and values come from the data available to your team. If a CRM sync is unhealthy or a field is not mapped, its values may be missing or outdated.
Choose an audience method
Depending on the team’s CRM and campaign configuration, the campaign wizard can offer:- Avoca Audience Filters: reusable criteria built from synced customer, location, job, estimate, membership, recurring-service, equipment, and other CRM data
- ServiceTitan Audience Lists: an existing list prepared in ServiceTitan
- XLSX Import: a spreadsheet uploaded for a controlled campaign
- Existing Audience: a previously created audience that can be reused
Create a filter
- Select New Filter.
- Give the filter a name that explains who belongs in it.
- Select service areas when the audience should be geographically limited.
- Add an Include group and choose a category such as customer, location, job, invoice, estimate, membership, recurring service, or equipment.
- Add the criteria that define an eligible person.
- Add another include group when a separate set of customers should also qualify.
- Add an Exclude group for records that must be removed from the result.
- Review the estimated eligible count and preview members.
- Save the filter, then select it from the Audience step of campaign creation.
Location-level audiences for program customers
Some program-customer teams store each real household as a ServiceTitan location beneath an umbrella customer. When Avoca enables location-level audience mode for one of these teams, a matching active location becomes its own audience member and uses that location’s phone and email contacts. A program location without a usable location contact is excluded instead of inheriting the umbrella customer’s shared phone number. Filters that contain location criteria include only the locations that match those criteria; customer-only criteria can include all eligible locations beneath the matching customer. Preview representative members and compare the location, contact details, and expected household count before launching or extending a campaign.Select specific customers
For ServiceTitan-backed Avoca filters, use Customer → Specific Customers when the audience should contain named people instead of everyone who matches a broad CRM condition.- Add or open a Customer category in an Include group.
- Select Specific Customers.
- Search by customer name, address, or phone number.
- Select each intended customer and review the selected-name chips.
- Preview the audience and confirm that the total matches the people you selected.
Validate the audience
Before using a filter in a campaign:- Compare the estimated count with the business expectation.
- Preview representative members and confirm why they qualify.
- Check service areas and all include and exclude groups.
- Confirm that recent CRM changes have finished syncing.
- Apply the separate campaign exclusion list during campaign creation.
Maintain saved filters
The Audience Filters list shows active and archived filters, estimated people, linked campaigns, and update time. Edit an active filter when its business definition changes. Archive it when it should no longer be selected for new campaigns.Use a ServiceTitan audience list
Select ServiceTitan Audience during audience creation, then choose the intended ServiceTitan list.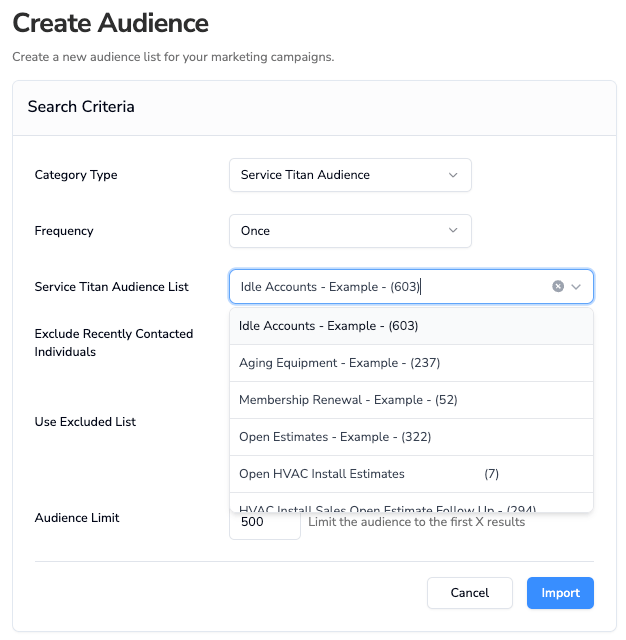
Import an XLSX audience
Select XLSX Import, download the current template when needed, and upload the reviewed workbook.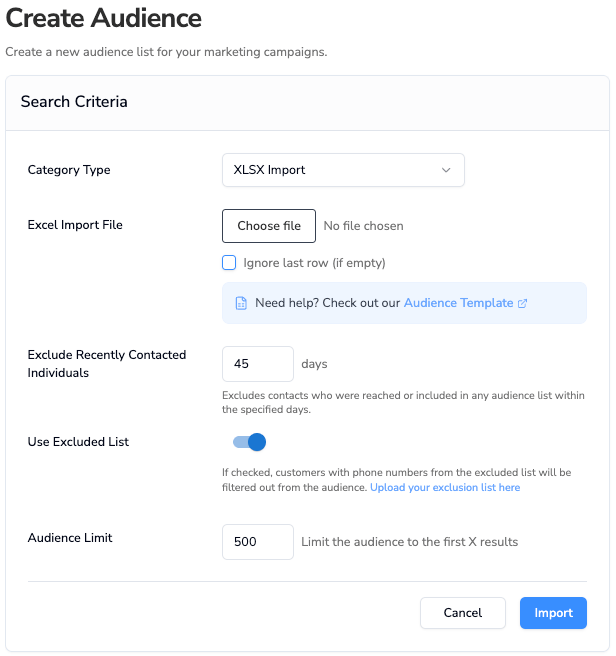
- Keep one person per row.
- Include the phone and any fields required by workflow variables.
- Remove formulas and unrelated sheets.
- Decide whether an empty last row should be ignored.
- Configure the recently contacted window.
- Keep Use Excluded List enabled.
- Set an audience limit for the initial run.